Eilmer3
Eilmer3 is a simulation code for 2D and 3D gas dynamics. It is a research and education code, suitable for the exploration of flows where the bounding geometry is not too complex.
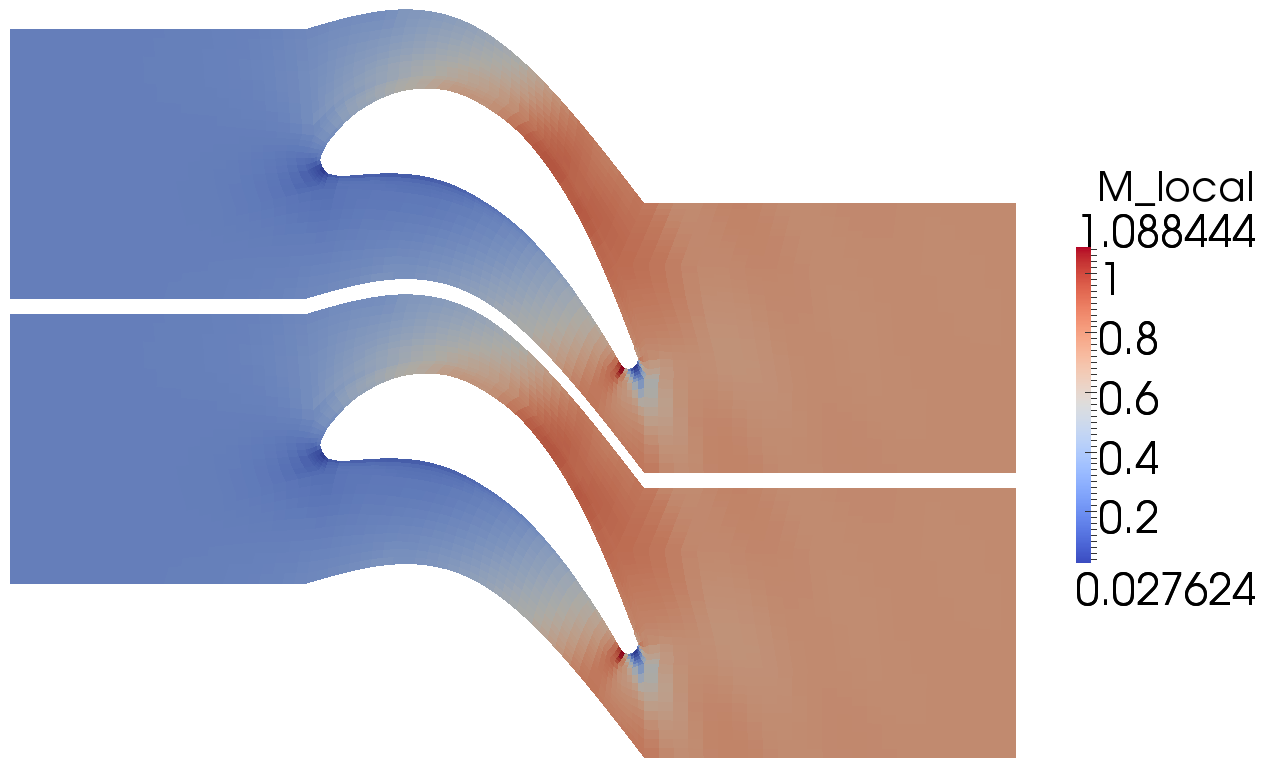
Transonic flow through a plane turbine cascade (Kiock et al., 1986). Simulation by Peter Blyton, 2011. Visualization with Paraview.
Documententation (PDF)
The full Eilmer3 User Guide and Example Book: pdf-user-guide
The Theory Book: pdf-theory-book
Slides from Fabian Zander’s lecture introducing Eilmer3 to MECH4480 students: zander-lecture-slides
Typical build and run procedure
The new 2D/3D code Eilmer3 is built from source into
an installation directory $HOME/e3bin/.
A typical build procedure (using the default TARGET=for_gnu) might be:
$ cd $HOME/cfcfd3/app/eilmer3/build
$ make install
$ make clean
Or, if you want the MPI version of the code built as well:
$ cd $HOME/cfcfd3/app/eilmer3/build
$ make TARGET=for_openmpi install
$ make clean
You may need to add the installation directory to your system’s search path to run Eilmer3. On a recent Linux system, this could be done by adding the line:
$ export PATH=${PATH}:${HOME}/e3bin
to the .bash_profile or .bashrc file in your home directory.
To access the Lua gas module from within the user-defined (Lua) functions, or to use the REFPROP gas model, the following lines should also be added to your bash configuration:
$ export LUA_PATH=${HOME}/e3bin/?.lua
$ export LUA_CPATH=${HOME}/e3bin/?.so
$ export LD_LIBRARY_PATH=${LD_LIBRARY_PATH}:${HOME}/e3bin
If you wish to make use of the cfpylib functions from your own stand-alone Python scripts, it may be convenient to set the PYTHONPATH environment variable:
$ export PYTHONPATH=${PYTHONPATH}:${HOME}/e3bin/
If you choose to install eilmer3 in a different location from the
default location ($HOME/e3bin), then you will need to
set an environment variable called E3BIN and point it to
the non-standard install directory. For example, if you installed
the executables and supporting scripts to: /work/e3bin then
you would set the following in your .bashrc:
$ export E3BIN=/work/e3bin
For running on Fedora, also add the following:
module load openmpi-i386
# Or, for 64-bit:
module load openmpi-x86_64
Then, try out the cone20-simple example:
$ mkdir $HOME/work; cd $HOME/work; mkdir 2D; cd 2D
$ mkdir cone20-simple; cd cone20-simple
$ cp $HOME/cfcfd3/examples/eilmer3/2D/cone20-simple/* .
$ ./cone20_run.sh  # exercise the shared-memory version of the code
or:
$ ./cone20_run_mpi.sh # exercise the MPI version of the code
This should generate a postscript figure of the drag coefficient history about a sharp 20-degree cone and also put the VTK data file into the plot/ subdirectory. It is not really necessary to make all of the subdirectories as shown above, however, that arrangement reflects the directory tree that PJ uses. If you want him to come and look at your simulation files when things go wrong, use the same. If not, use whatever hierarchy you like.
Summary of lines for your .bashrc file:
export E3BIN=${HOME}/e3bin
export PATH=${PATH}:${E3BIN}
export LUA_PATH=${E3BIN}/?.lua
export LUA_CPATH=${E3BIN}/?.so
export PYTHONPATH=${PYTHONPATH}:${E3BIN}
export LD_LIBRARY_PATH=${LD_LIBRARY_PATH}:${E3BIN}
Building and running on Mac OSX
This is mostly the same as for a Linux machine but we provide a couple of specific targets:
$ make TARGET=for_macports_gnu install
$ make TARGET=for_macports_openmpi install
Building and running on the Barrine cluster at UQ
The details of running simulations on any cluster computer will be specific to the local configuration. The Barrine cluster is run by the High-Performance Computing Unit at The University of Queensland and is a much larger machine, with a little over 3000 cores, running SUSE Enterprise Linux.
These instructions are current as of August, 2015.
Set up your environment by adding the following lines to your .bashrc file:
module purge
module load mercurial
module load devenv/2012-12-intel
module load numpy/1.6.1
export PATH=${PATH}:${HOME}/e3bin
export LUA_PATH=${HOME}/e3bin/?.lua
export LUA_CPATH=${HOME}/e3bin/?.so
It’s best to copy the code into the 30days filesystem
before compiling:
$ rsync -zav --exclude=".hg" cfcfd3 /30days/$USER
To compile the MPI-version of the code, use the commands:
$ cd /30days/$USER/cfcfd3/app/eilmer3/build
$ make TARGET=for_intel_mpi install
Optionally, clean up after the build:
$ make clean
To submit a job to Torque, which is the batch queue system on barrine, use the command:
$ qsub script_name.sh
Be sure to copy your simulation files over to 30days/$USER and start
your job on the filesystem for temporary files, as per the instructions.
(And remember to copy them back when you are finished.)
An example of a shell script prepared for running on the Barrine cluster:
#!/bin/bash -l
#PBS -S /bin/bash
#PBS -N lehr
#PBS -l nodes=3:ppn=8,mem=1GB
#PBS -l walltime=6:00:00
#PBS -A uq-MechMingEng
echo "-------------------------------------------"
echo "Begin MPI job..."
date
cd $PBS_O_WORKDIR

mpirun -np 24 e3mpi.exe --job=lehr --run --max-wall-clock=20000 > LOGFILE

echo "End MPI job."
date
This is the script input examples/eilmer3/2D/lehr-479/run-on-barrine.qsub.
Here, we ask for 3 nodes with 8 processors each for a set of 24 MPI tasks.
Note the -A accounting option. You will have to use an appropriate group
name and you can determine which groups you are part of with the groups
command. Typical with most queueing systems, the batch control will drop
you in your $HOME directory, so we need to change to the working
directory before running the simulation code. Finally, we have redirected the
standard output from the main simulation to the file LOGFILE so that
we can monitor progress with the command:
$ tail -f LOGFILE
Building and running the radiation transport solver
While a flowfield calculation with coupled radiation can be performed via the single processor version of eilmer3 (e3shared.exe), the radiation transport portion of such calculations can often take a very long time to run. The obvious solution is to implement the radiation transport calculation in parallel. Due to the non-local nature of the radiation transport problem, however, for most radiation transport models it is necessary to implement the parallelisation via the shared memory multiprocessor approach. The radiation transport solver in eilmer3 has therefore been written to make use of the OpenMP API. As the Eilmer3 flowfield solver does not currently support an OpenMP build, the radiation transport solver can be built as a separate executable, e3rad.exe.
The typical build procedure for the OpenMP version of the radiation transport solver using the GNU compiler is:
$ cd $HOME/cfcfd3/app/eilmer3/build
$ make TARGET=for_gnu_openmp e3rad
$ make clean
Then, try out the radiating-cylinder example:
$ mkdir $HOME/work; cd $HOME/work; mkdir 2D; cd 2D
$ mkdir radiating-cylinder; cd radiating-cylinder
$ cp $HOME/cfcfd3/examples/eilmer3/2D/radiating-cylinder/* .
$ tclsh cyl.test
On the barrine cluster, the Intel compiler should be used for best performance:
$ cd $HOME/cfcfd3/app/eilmer3/build
$ make TARGET=for_intel_openmp e3rad
$ make clean
It should be noted that the e3mpi.exe executable is able to run radiation transport calculations in parallel when either the “optically thin” or “tangent slab” models are implemented, however a specific blocking layout is required for the “tangent slab” model. See the radiatively coupled Hayabusa simulation in $HOME/cfcfd3/examples/eilmer3/2D/hayabusa for an example of this blocking layout.
When things go wrong
Eilmer3 is a complex piece of software, especially when all of the thermochemistry comes into play. There will be problems buried in the code and, (very) occasionally, you will expose them. We really do have some pride in this code and will certainly try to fix anything that is broken, however, we do this work essentially on our own time and that time is limited.
When you have a problem, there are a number of things that you can do to minimize the duration and pain of debugging:
- Check the repository and be sure that you have the most recent revision of the code. This code collection is a work in progress and, in some cases, you will not be the only one hitting a blatant bug. It is likely that we or someone else has hit the same problem and, if so, it may be fixed already. The code changes daily in small ways. This may sound chaotic, such that you should just stay with an old version, however, we do try hard to not break things. In general, it is safest to work with the lastest revision.
- Put together a simple example that displays the problem. This example should be as simple as possible so that there are not extra interactions that confuse us.
- Provide a complete package of input files and output pictures. We should be able to run your simulation within a few minutes and see the same output.
- Be prepared to dig into the code and identify the problem yourself. We appreciate all of the help that we can get.
Source Code Docs
The following documentation is tentative and experimental. Use the PDF files above; they are the primary documents.
Docs omitted.
Other Notes
On Xserver for Linux (especially Ubuntu):
If Paraview crashes on exporting a bitmap image, try adding the line:
Option "AIGLX" "false"
to the Section “ServerLayout” in
/etc/X11/xorg.confTo use Paraview 3.6.1 on Ubuntu 9.04 or later, it seems that we need to customize the look of the desktop by turning off the Visual Effects. This setting can be found in the System->Preferences->Appearance menu.
To get Paraview Screenshot to behave, uncheck “Use Offscreen Rendering for Screenshots” button in the Edit->Settings (“Options”) dialog. You will find the checkbutton under “Render View”->General.
Transferring input files between machines
If you find you want to transfer just the input files between
machines, ignoring the generated output files, you can do this by
using the --exclude option for the rsync command. For example,
to transfer just the input files of a directory called my-sim on a
local machine to a remote machine, use:
$ rsync -av --exclude=flow --exclude=grid --exclude=hist --exclude=heat \
--exclude=plot my-sim/ remote:my-sim
If you find you are using this often, you can define an alias as
appropriate for your shell. In BASH, I add the following line to my
.bashrc file:
alias rsync-eilmer="rsync -av --progress --exclude=flow --exclude=grid \
--exclude=hist --exclude=heat --exclude=plot"
Then I can use do the above transfer by issuing the following command:
$ rsync-eilmer my-sim/ remote:my-sim